Data Transfer Node Setup
Due to increasing size of climatology datasets published recently, a network link to the data nodes becomes frequently a bottleneck what forces the ESGF admins to migrate the data nodes to hardware with a higher bandwidth network link. Taking into account that the hardware upgrade is not always possible or an upgraded link may become a bottleneck in the near future, setting up a DTN node (https://fasterdata.es.net/science-dmz/DTN/) with access to the same filesystem to do load balancing can be considered as another option. This page describes all steps needed to install GridFTP server with the esgsaml authorization callout and configure load balancing by adding the server to an existing Globus endpoint pointing to the data node. It is assumed that Linux system installed on the DTN node satisfies the same requirements as the ESGF data node - it is RHEL 6 or CentOS 6 with the EPEL software repository configured.
1. Install Globus Connect Server IO
# rpm --import http://www.globus.org/ftppub/globus-connect-server/RPM-GPG-KEY-Globus
# yum -y install http://toolkit.globus.org/ftppub/globus-connect-server/globus-connect-server-repo-latest.noarch.rpm
# yum -y install globus-connect-server-io
More information about installing Globus Connect Server can be found at https://www.globus.org/globus-connect-server.
2. Add the ESGF software repository
# cat > /etc/yum.repos.d/esgf.repo
[esgf]
name=ESGF
baseurl=http://distrib-coffee.ipsl.jussieu.fr/esgf/RPM/centos/6/x86_64
failovermethod=priority
enabled=1
priority=90
gpgcheck=0
If the DTN node runs RHEL Linux, replace ‘centos’ with ‘redhat’ in the path above. You can also copy this file from the data node.
3. Install ESGF authorization packages
yum -y install globus-authz-esgsaml-callout globus-gaa globus-adq customgsiauthzinterface
4. Configure Globus Connect Server IO
Copy /etc/globus-connect-server-esgf.conf from the data node
[Globus]
User = %(GLOBUS_USER)s
Password = %(GLOBUS_PASSWORD)s
[Endpoint]
Name =  <short_hostname_of_the_data_node>
Public = True
[Security]
FetchCredentialFromRelay = True
#CertificateFile = /etc/grid-security/hostcert.pem
#KeyFile = /etc/grid-security/hostkey.pem
TrustedCertificateDirectory = /etc/grid-security/certificates/
IdentityMethod = MyProxy
AuthorizationMethod = Gridmap
[GridFTP]
Server = %(HOSTNAME)s
IncomingPortRange = 50000,51000
OutgoingPortRange = 50000,51000
RestrictPaths = R/,N/etc,N/tmp,N/dev
Sharing = False
SharingRestrictPaths = R/
SharingStateDir = /etc/grid-security/sharing/$USER
[MyProxy]
Server = <FQDN of the IdP node>
To add the GridFTP server to the existing Globus endpoint associated with the data node, you must use the same Globus username as you used when running esg-node on the data node and the same endpoint name. The endpoint name on the data node was picked automatically - it is a short hostname of the data node. You can also comment out ‘CertificateFile’ and ‘KeyFile’ and let Globus Connect Server setup script to obtain a certificate and a private key from Globus. After all the changes run: globus-connect-server-io-setup -v -c /etc/globus-connect-server-esgf.conf
6. Add ESGF specific GridfTP configuration
GridFTP server on the dat node runs in a chroot jail that is set up at /esg/gridftp_root. To keep the same configuration consistent with the data node, you can create the same directory with subdirectories on the DTN node and bind shared dataset root directories to the subdirectories. For example: mount –bind /esg/data /esg/gridftp_root/esg_dataroot
Dataset files in /esg/data on your data node may be mounted at a different directory on the DTN node, so you will have to change ‘/esg/data’ in the command above accordingly. When all dataset root directories are accessible on the DTN node under /esg/gridftp_root the same as on the data node, you can copy /etc/gridftp.d/globus-esgf file from the data node:
#cat > /etc/gridftp.d/globus-esgf
 chroot_path /esg/gridftp_root
 usage_stats_id ESGF2811
 usage_stats_target usage-stats.globus.org:4810
 acl customgsiauthzinterface
 $GLOBUS_USAGE_DEBUG “MESSAGES,/esg/log/esg-server-usage-gridftp.log”
 $GSI_AUTHZ_CONF “/etc/grid-security/authz_callouts_esgsaml.conf”
 $GLOBUS_GSI_AUTHZ_DEBUG_LEVEL “10”
 $GLOBUS_GSI_AUTHZ_DEBUG_FILE “/var/log/gridftp-debug.log”
Copy /etc/grid-security/esgsaml_auth.conf from the data node:
# cat >/etc/grid-security/esgsaml_auth.conf
AUTHSERVICE=https:///esg-orp/saml/soap/secure/authorizationService.htm
Because GridFTP server will run in a chroot jail, you have to setup a chroot environment. The following command will copy CA certificates, passwd, group, nsswitch.conf and other files required by GridFTP server:
# globus-gridftp-server-setup-chroot -r /esg/gridftp_root
And restart GridFTP server:
# service globus-gridftp-server restart
7. Test
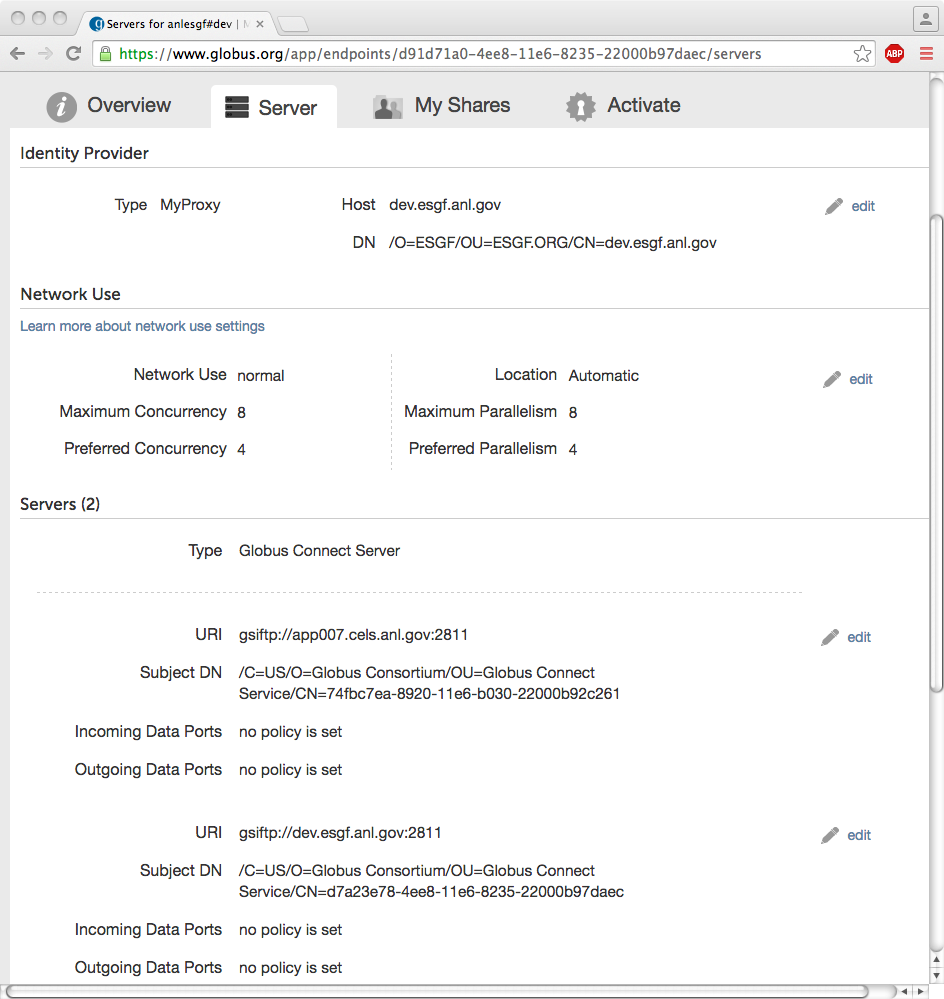
Now, you should be able to access datasets through the Globus Web UI which will do load balancing across the data node and the DTN. When you go to https://www.globus.org/app/endpoints?scope=my-endpoints, and select an enpoint associated with the dat node and click the ‘Server’ tab, you should see two GridFTP servers. On the example screenshot, dev.esgf.anl.gov is the IdP node with MyProxy server (‘Identity Provider’) and the data node with GridFTP server (‘Servers’). App007.cels.anl.gov is the DTN node with GridFTP server (gsiftp://app007.cels.anl.gov:2811):
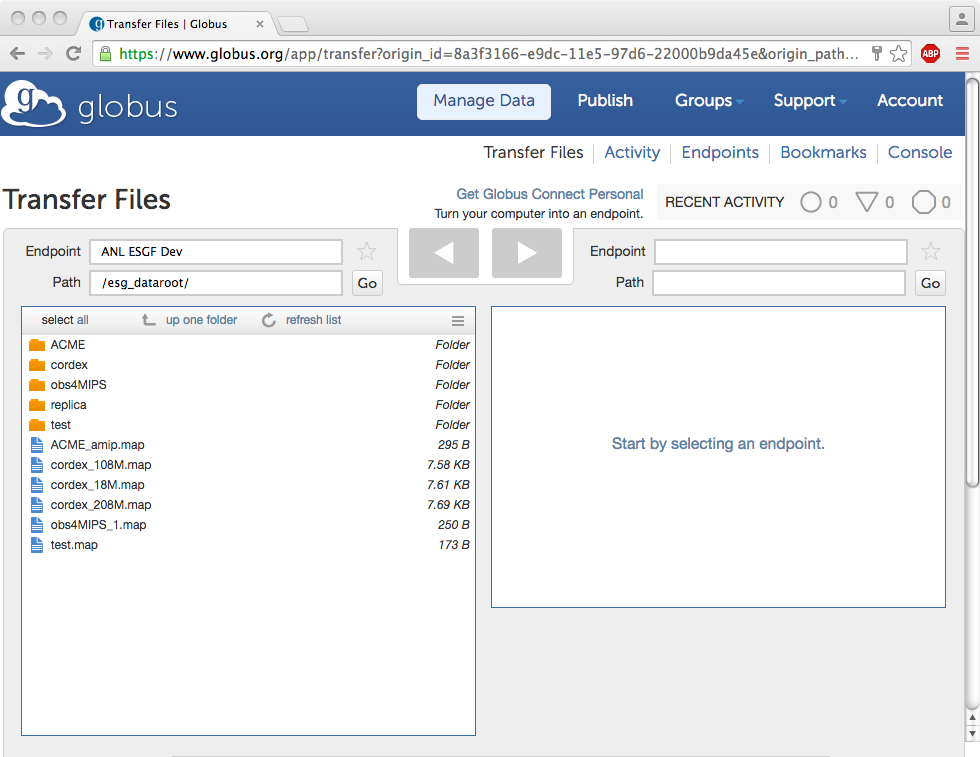
To see datasets, go to https://www.globus.org/app/transfer and select your Globus endpoint. Click the ‘Go’ button to be sure that Globus hits your new DTN GridFTP server when listing the root directory.